I nice trick I learned a while ago that is worth sharing: calculating pi the unix way (you know, on the command line, with pipes, as god intended).
I would like to give credit to the original source of this command, but I just couldn't find it. It was some of those "shell one-liners" you see on hacker news five times a day, except I didn't know half of them. The most interesting was a semi-cryptic command line with a pretentious comment besides it:
# calculates pi the unix way
I remember as if it was today how puzzled I was by that line. As I said, I didn't know much of the incantations on that list, but this was by far the most magical. The line goes like this:
$ seq -f '4/%g' 1 2 9999 | paste -sd-+ | bc -l
If you like a challenge (as I do), try to figure it out by yourself. A shell and the man pages are your best friends.
seq
If shell (or python) wasn't your first programming language, you were probably surprised by the way loops are done. It usually goes like this:
$ for x in 1 2 3 4 5; do echo "$x"; done
1
2
3
4
5
If you have a little experience with shell, you probably learned there is a more idiomatic way of doing this using the seq command and some shell voodoo:
$ for x in $(seq 1 5); do echo "$x"; done
And if you were truly initiated on the dark arts of bash programming, you probably know this is functionally equivalent to this:
$ for x in {1..5}; do echo "$x"; done
I won't explain how shell command substitution works, suffice to say seq is a nice utility to generate sequences (get it?) of numbers. From the first lines of the man page:
$ man seq | grep -A 3 SYNOPSIS
SYNOPSIS
seq [OPTION]... LAST
seq [OPTION]... FIRST LAST
seq [OPTION]... FIRST INCREMENT LAST
So the main part of the first command on the pipe is no magic: we are generating numbers from 1 to 9999 with a step of 2:
$ echo $(seq 1 2 9999 | head -5)
1 3 5 7 9
There is a useful option to this command to control how the value is output:
$ seq -f '%02g' 1 3 10
01
04
07
10
Programmers familiar with c will recognize the printf format string. Moving down the pipe...
paste
There are some commands that do something so simple they seem almost useless:
$ whatis -l paste
paste (1) - merge lines of files
paste (1p) - merge corresponding or subsequent lines of files
Nothing really interesting here, right?
$ paste <(seq 1 3) <(seq 4 6)
1 4
2 5
3 6
$ seq 1 6 | paste - -
1 2
3 4
5 6
Well, that is interesting. What if we play with the other options?
$ paste -sd, <(seq 1 3) <(seq 4 6)
1,2,3
4,5,6
$ seq 1 6 | paste -sd,
1,2,3,4,5,6
This simple command is starting to show complex behavior. Maybe there is something interesting in those old unix books after all... Wait:
$ seq 1 6 | paste -sd+
1+2+3+4+5+6
Nice, a mathematical expression. If only we had some way of interpreting it...
bc
There are people who say: the python/ruby interpreter is my calculator. To that I say: screw that!
$ bc -ql
1 + 2 + 3
6
10 / 12
.83333333333333333333
scale = 80
10 / 12
.8333333333333333333333333333333333333333333333333333333333333333333\
3333333333333
Do you see that `\` character? It's almost as if it was meant to be used on a shell...
$ seq 1 6 | paste -sd+ | bc -l
21
Interlude: Gregory-Leibniz
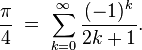
There are many ways of calculating π. You can find many of them on its wikipedia page. One of them is named after two mathematicians, James Gregory and Gottfried Leibniz, goes like this (again from wikipedia):
This is an infinite series with a simple pattern, which I'm sure you can identify (you weren't sleeping on those calculus classes, were you?). Just in case you can't (and because it is a pretty equation), here it is:
Back in unix-land
So here is the challenge: how can we generate and evaluate the terms of this series? Generating each term, without the sign, can be done easily with seq and a format string:
$ seq -f '1/%g' 1 2 9
1/1
1/3
1/5
1/7
1/9
Remember our useful-where-you-never-imagined friend paste?
$ seq -f '1/%g' 1 2 9 | paste -sd-+
1/1-1/3+1/5-1/7+1/9
This may take some time to understand, it's ok. Read those man pages! But once you understand, the only thing left is to evaluate the expression:
$ seq -f '1/%g' 1 2 9 | paste -sd-+ | bc -l
.83492063492063492064
Hmm, not much π-like, is it? Right, this is π/4. Ok, we can rearrange the terms a bit to fit our tools (that is the essential hacker skill). Lets move the denominator on the right side to the numerator on the left.
$ seq -f '4/%g' 1 2 9 | paste -sd-+ | bc -l
3.33968253968253968254
That's more like it! As any infinite series approximation, we can increase the number of terms to increase accuracy:
$ seq -f '4/%g' 1 2 9999 | paste -sd-+ | bc -l
3.14139265359179323814
Now just for the heck of it:
$ seq -f '4/%g' 1 2 999999 | paste -sd-+ | bc -l
3.14159065358979323855
And there you have it. Enjoy your unix π.
Showing posts with label python. Show all posts
Thursday, December 11, 2014
Wednesday, December 10, 2014
pip --extra-index
This is a tale of debugging. That fine art of digging the darkest corners of a computer system to solve whatever problem is haunting it. This particular story is about python's package manager, pip.
Where I work, we have a server where we store all python packages used in development and production. A package "cache" or "proxy". The idea is similar to a http proxy: we don't have to hit PyPi for each package query and install. That saves time, as local connections are much faster, both regarding latency and throughput, and bandwidth, as no packet has to leave our lan.
One day, all of a sudden, our testing and production servers started taking a long time to run a simple package update. And when I say "a long time", I mean taking more than ten minutes to run a simple `pip install --update` with roughly fifty packages on a requirements.txt file. That is a ridiculously long time. That would be crazy slow even if we were hitting the wan, but on a lan, that is just absurd. So, clearly, something fishy was going on.
Debugging begins
Step one when debugging an issue: figure out what changed. I thought long and hard (harder than longer, I must admit) about it, but couldn't think of anything I or anyone else had changed on these machines recently. So I advanced to step two: getting a small, reproducible test.
In this case, the test can be reduced to a simple command line execution:
$ pip install -Ur requirements.txt
This is a standard pip requirements file, with the standard options to prefer our internal server over the official PyPi server:
$ head -2 requirements.txt
--index-url=http://pypi.example.com/simple/
--extra-index-url=http://pypi.python.org/simple/
Here and in the next examples, I'll substitute the real domains for our servers for fake ones. Anyway, running that one simple command was all that was needed to test the strange behavior. On my personal development machine, that took quite a while:
$ time pip install -Ur requirement.txt &> /dev/null
real 0m41.280s
user 0m3.557s
sys 0m0.100s
Even more interestingly, this was way less time than we were seeing on the servers:
$ time pip install -Ur requirement.txt &> /dev/null
real 13m19.752s
user 0m1.031s
sys 0m0.184s
On the server
The three main servers affected by this issue (the ones I spend most time in) were our buildbot (i.e. continuous integration), staging and production servers. I decided the first test would be on the buildbot server, as it is the same server where the packages are hosted. That way, I can exclude many external factors that could be affecting the traffic.
So I fired my favorite tool: the amazing strace. If you don't know it, stop everything and go take a look at `strace(1)`. Since I know most people won't, here's a quick introduction: strace execve(2)'s your command, but sets up hooks to display every system call it executes, along with arguments, return values and everything. It is an amazing tool to have an overall idea of what a process is doing. If you are root (and have CAP_SYS_TRACE), you can even attach to a running process, which is an amazing way to debug a process that starts running wild.
Using it to run the command:
$ strace -r -o strace.txt pip install -Ur requirement.txt
The arguments here are `-o strace.txt` to redirect output to a file and the super useful `-r` to output the relative time between each system call, which is perfect to identify the exact system calls slowing down the execution of the command.
After the execution was done, looking at the output, I found the culprit. Here is a sample of the log:
$ grep -m 1 -B 5 close strace.txt
0.000138 socket(PF_INET, SOCK_STREAM, IPPROTO_TCP) = 4
0.000115 fcntl(4, F_GETFL) = 0x2 (flags O_RDWR)
0.000092 fcntl(4, F_SETFL, O_RDWR|O_NONBLOCK) = 0
0.000089 connect(4, {sa_family=AF_INET, sin_port=htons(80), sin_addr=inet_addr("23.235.39.223")}, 16) = -1 EINPROGRESS (Operation now in progress)
0.000128 poll([{fd=4, events=POLLOUT}], 1, 15000) = 0 (Timeout)
15.014733 close(4)
From this point, my analysis had some flaws that delayed the final conclusion. I will explain my line of thought as it happened, maybe you'll find the mistakes before I get to them. So, as can be seen in the output, a socket is opened to communicate with another server, which is normal behavior for pip, but then closing it takes around fifteen seconds. Hmm, that is really odd.
So I ran the command again and, while it was blocked waiting, I used another useful command to list the open file descriptors of the process:
$ lsof -p $(pgrep pip) | tail -2
pip 19928 django 3u IPv4 8064331 0t0 TCP
pypi.example.com:38804->pypi.example.com:http (CLOSE_WAIT)
pip 19928 django 4u IPv4 8064359 0t0 TCP
pypi.example.com:30470->199.27.76.223:http (SYN_SENT)
Here we have two open sockets. One of them is in the CLOSE_WAIT state. Anyone who's ever done socket programming knows this dreaded state, where the local socket is closed but the remote end doesn't send the FIN packet to terminate the connection. A few minutes of tcpdump later, I was convinced that was the problem: something was preventing the connection from ending and each operation was waiting for the timeout to close the socket. That would explain why closing the socket took so long.
The mistakes
At this point, I realised my first mistake. If you take a look at the strace output again, the remote end of the socket is *not* our server. Take a look at the remote address (the `sin_addr` parameter to the `socket` call): 23.235.39.223 is not the ip address of our server, and taking a look at the rest of the output showed that the address changed over time.
There should be no other servers involved, since we explicitly told pip to fetch packages from our own server. So I thought: what other server could be involved here? So I took a guess:
$ dig pypi.python.org | grep -A 2 'ANSWER SECTION'
;; ANSWER SECTION:
pypi.python.org. 52156 IN CNAME python.map.fastly.net.
python.map.fastly.net. 30 IN A 23.235.46.223
Damn... Wait!
$ dig pypi.python.org | grep -A 2 'ANSWER SECTION'
;; ANSWER SECTION:
pypi.python.org. 3575 IN CNAME python.map.fastly.net.
python.map.fastly.net. 7 IN A 23.235.39.223
Bingo! So it was a connection to one of PyPi's servers. I went back to the strace output and realised my second mistake. If you read strace's man page section for the `-r` option carefully, the delta shown before each line is not the time each syscall took, but the time between that syscall and the last. So the operation that was getting stuck was not `close`, but the previous, `epoll`.
In hindsight, it is obvious. You can see the indication that the call timed out. You can even see the timeout is one of the parameters. And so the mystery was solved. By some unknown reason, pip was trying to make a connection to PyPi after checking our server. Since we don't allow that, the operation hang around until the timeout was reached. One final test confirmed our suspicion:
$ time pip install -Ur requirement.txt &> /dev/null
real 0m42.981s
user 0m3.720s
sys 0m0.070s
$ sed -ie 's/^--extra-index/#&/' requirements.txt
$ time pip install -Ur requirement.txt &> /dev/null
real 0m1.049s
user 0m0.853s
sys 0m0.057s
Removing the extra index option eliminated the issue (and gave us a ~42x speed up, something you don't see everyday).
Conclusion
So, what do we take out of this (unexpectedly long) story? If you are using a local package server, don't use `--extra-index`. I have no idea why pip was trying to contact the extra index after finding the package on our server. The only reason I can think of is it is trying to find a newer version of the package, but even then, most of our requirements are fixed, i.e. they have '==${some_version}' appended.
Even on my development machine, where pip can reach the remote server, it is worth it to remove the option. The time it takes just to reach the server for each package, even just to receive a "package up-to-date" message, slows down the operation considerably:
$ time pip install -Ur requirement.txt &> /dev/null
real 0m46.816s
user 0m3.853s
sys 0m0.130s
$ sed -ie 's/^--extra-index/#&/' requirements.txt
$ time pip install -Ur requirement.txt &> /dev/null
real 0m1.125s
user 0m0.947s
sys 0m0.053s
Coda
Thank you for making it this far. I hope this story was entertaining and hopefully it taught you a thing or two about investigation, debugging and problem solving. Take the time to learn the basic tools: ps, lsof, tcpdump, strace. I assure you they will be really useful when you encounter this type of situation.
Where I work, we have a server where we store all python packages used in development and production. A package "cache" or "proxy". The idea is similar to a http proxy: we don't have to hit PyPi for each package query and install. That saves time, as local connections are much faster, both regarding latency and throughput, and bandwidth, as no packet has to leave our lan.
One day, all of a sudden, our testing and production servers started taking a long time to run a simple package update. And when I say "a long time", I mean taking more than ten minutes to run a simple `pip install --update` with roughly fifty packages on a requirements.txt file. That is a ridiculously long time. That would be crazy slow even if we were hitting the wan, but on a lan, that is just absurd. So, clearly, something fishy was going on.
Debugging begins
Step one when debugging an issue: figure out what changed. I thought long and hard (harder than longer, I must admit) about it, but couldn't think of anything I or anyone else had changed on these machines recently. So I advanced to step two: getting a small, reproducible test.
In this case, the test can be reduced to a simple command line execution:
$ pip install -Ur requirements.txt
This is a standard pip requirements file, with the standard options to prefer our internal server over the official PyPi server:
$ head -2 requirements.txt
--index-url=http://pypi.example.com/simple/
--extra-index-url=http://pypi.python.org/simple/
Here and in the next examples, I'll substitute the real domains for our servers for fake ones. Anyway, running that one simple command was all that was needed to test the strange behavior. On my personal development machine, that took quite a while:
$ time pip install -Ur requirement.txt &> /dev/null
real 0m41.280s
user 0m3.557s
sys 0m0.100s
Even more interestingly, this was way less time than we were seeing on the servers:
$ time pip install -Ur requirement.txt &> /dev/null
real 13m19.752s
user 0m1.031s
sys 0m0.184s
On the server
The three main servers affected by this issue (the ones I spend most time in) were our buildbot (i.e. continuous integration), staging and production servers. I decided the first test would be on the buildbot server, as it is the same server where the packages are hosted. That way, I can exclude many external factors that could be affecting the traffic.
So I fired my favorite tool: the amazing strace. If you don't know it, stop everything and go take a look at `strace(1)`. Since I know most people won't, here's a quick introduction: strace execve(2)'s your command, but sets up hooks to display every system call it executes, along with arguments, return values and everything. It is an amazing tool to have an overall idea of what a process is doing. If you are root (and have CAP_SYS_TRACE), you can even attach to a running process, which is an amazing way to debug a process that starts running wild.
Using it to run the command:
$ strace -r -o strace.txt pip install -Ur requirement.txt
The arguments here are `-o strace.txt` to redirect output to a file and the super useful `-r` to output the relative time between each system call, which is perfect to identify the exact system calls slowing down the execution of the command.
After the execution was done, looking at the output, I found the culprit. Here is a sample of the log:
$ grep -m 1 -B 5 close strace.txt
0.000138 socket(PF_INET, SOCK_STREAM, IPPROTO_TCP) = 4
0.000115 fcntl(4, F_GETFL) = 0x2 (flags O_RDWR)
0.000092 fcntl(4, F_SETFL, O_RDWR|O_NONBLOCK) = 0
0.000089 connect(4, {sa_family=AF_INET, sin_port=htons(80), sin_addr=inet_addr("23.235.39.223")}, 16) = -1 EINPROGRESS (Operation now in progress)
0.000128 poll([{fd=4, events=POLLOUT}], 1, 15000) = 0 (Timeout)
15.014733 close(4)
From this point, my analysis had some flaws that delayed the final conclusion. I will explain my line of thought as it happened, maybe you'll find the mistakes before I get to them. So, as can be seen in the output, a socket is opened to communicate with another server, which is normal behavior for pip, but then closing it takes around fifteen seconds. Hmm, that is really odd.
So I ran the command again and, while it was blocked waiting, I used another useful command to list the open file descriptors of the process:
$ lsof -p $(pgrep pip) | tail -2
pip 19928 django 3u IPv4 8064331 0t0 TCP
pypi.example.com:38804->pypi.example.com:http (CLOSE_WAIT)
pip 19928 django 4u IPv4 8064359 0t0 TCP
pypi.example.com:30470->199.27.76.223:http (SYN_SENT)
Here we have two open sockets. One of them is in the CLOSE_WAIT state. Anyone who's ever done socket programming knows this dreaded state, where the local socket is closed but the remote end doesn't send the FIN packet to terminate the connection. A few minutes of tcpdump later, I was convinced that was the problem: something was preventing the connection from ending and each operation was waiting for the timeout to close the socket. That would explain why closing the socket took so long.
The mistakes
At this point, I realised my first mistake. If you take a look at the strace output again, the remote end of the socket is *not* our server. Take a look at the remote address (the `sin_addr` parameter to the `socket` call): 23.235.39.223 is not the ip address of our server, and taking a look at the rest of the output showed that the address changed over time.
There should be no other servers involved, since we explicitly told pip to fetch packages from our own server. So I thought: what other server could be involved here? So I took a guess:
$ dig pypi.python.org | grep -A 2 'ANSWER SECTION'
;; ANSWER SECTION:
pypi.python.org. 52156 IN CNAME python.map.fastly.net.
python.map.fastly.net. 30 IN A 23.235.46.223
Damn... Wait!
$ dig pypi.python.org | grep -A 2 'ANSWER SECTION'
;; ANSWER SECTION:
pypi.python.org. 3575 IN CNAME python.map.fastly.net.
python.map.fastly.net. 7 IN A 23.235.39.223
Bingo! So it was a connection to one of PyPi's servers. I went back to the strace output and realised my second mistake. If you read strace's man page section for the `-r` option carefully, the delta shown before each line is not the time each syscall took, but the time between that syscall and the last. So the operation that was getting stuck was not `close`, but the previous, `epoll`.
In hindsight, it is obvious. You can see the indication that the call timed out. You can even see the timeout is one of the parameters. And so the mystery was solved. By some unknown reason, pip was trying to make a connection to PyPi after checking our server. Since we don't allow that, the operation hang around until the timeout was reached. One final test confirmed our suspicion:
$ time pip install -Ur requirement.txt &> /dev/null
real 0m42.981s
user 0m3.720s
sys 0m0.070s
$ sed -ie 's/^--extra-index/#&/' requirements.txt
$ time pip install -Ur requirement.txt &> /dev/null
real 0m1.049s
user 0m0.853s
sys 0m0.057s
Removing the extra index option eliminated the issue (and gave us a ~42x speed up, something you don't see everyday).
Conclusion
So, what do we take out of this (unexpectedly long) story? If you are using a local package server, don't use `--extra-index`. I have no idea why pip was trying to contact the extra index after finding the package on our server. The only reason I can think of is it is trying to find a newer version of the package, but even then, most of our requirements are fixed, i.e. they have '==${some_version}' appended.
Even on my development machine, where pip can reach the remote server, it is worth it to remove the option. The time it takes just to reach the server for each package, even just to receive a "package up-to-date" message, slows down the operation considerably:
$ time pip install -Ur requirement.txt &> /dev/null
real 0m46.816s
user 0m3.853s
sys 0m0.130s
$ sed -ie 's/^--extra-index/#&/' requirements.txt
$ time pip install -Ur requirement.txt &> /dev/null
real 0m1.125s
user 0m0.947s
sys 0m0.053s
Coda
Thank you for making it this far. I hope this story was entertaining and hopefully it taught you a thing or two about investigation, debugging and problem solving. Take the time to learn the basic tools: ps, lsof, tcpdump, strace. I assure you they will be really useful when you encounter this type of situation.
Labels:
debugging,
grep,
linux,
lsof,
man,
pip,
programming,
python,
socket,
strace,
unix,
webserver
Saturday, May 11, 2013
python mocking
If you are into unit testing, you probably have been introduced to mocking. And if that is the case, you probably already have been bitten by it. Mocking requires some understanding of code execution, importing and name resolution that most people lack when first encountering such situations. In python, mocking is a relatively simple process, if you analyze carefully what needs to be done.
Mocking simply means replacing an object with another. This is usually done to avoid instantiating costly systems or to change the behaviour of a system. To begin with a simple example:
To avoid that, we can use mocking. Notice that all we need to test on some_other_function_in_your_code is that the argument passed has a member called "do_something" that can be called with no arguments and returns something that can be converted to bool. There are many ways to do that, but to keep things short, I'll skip right to the library I use most of the times, mock.
The main component of the mock library is the Mock class, which is basically an empty object with a few useful characteristics (be sure to check the documentation, because they are really useful). Two of them are important for this discussion. First, every time you access an attribute of a Mock object, another Mock object is created and assigned to the attribute being accessed.
The other feature of Mock objects is the return_value attribute. Whatever is contained in this attribute gets returned when the object is called as a function object [2].
This first section was easy, nothing you couldn't find out with a quick search on the internet. But the real world is not that pretty (at least mine isn't). The trickiest situation is when you have to change the behaviour of something inside a function, but you don't pass that something as an argument. Suppose we have this:
What happens when you run import random? You can watch this video to know exactly what. Or you can just continue reading to get a summary. Or both. Anyway:
Now you know how to mock, but there is something I must say before you leave. Always, always, ALWAYS restore any mock you do. Seriously. Even if you're sure no one will use the mocked attribute. You don't want to loose an entire day of work just to find out that the problem was an undone mock.
And doing it is so simple: store the original value on a variable and restore it after the operation. I like to do it as soon as the operation is complete, before anything else is executed, but you don't need to, if you're not paranoid. Just to clear any doubt, here is exactly how to do it:
1: You shouldn't have complicated processes that involve hundreds of operations anyway, but that is another problem.
2: Curious to know what happens when you access return_value without setting it first? No? Well, I'll show you anyway:
Mocking simply means replacing an object with another. This is usually done to avoid instantiating costly systems or to change the behaviour of a system. To begin with a simple example:
def some_function_in_your_code(a):Here we have a function some_other_function_in_your_code that uses an object. Somewhere else in your code, some_other_function_in_your_code creates that object, which is a complicated process that involves hundreds of operations. If you just want to test some_other_function_in_your_code, you shouldn't need to go through this whole process[1].
if a.do_something():
return 3.14159
else:
return 6.26318
def some_other_function_in_your_code():
# ...
a = create_complicated_object(*thousand_parameters)
result = some_other_function_in_your_code(a)
# ...
To avoid that, we can use mocking. Notice that all we need to test on some_other_function_in_your_code is that the argument passed has a member called "do_something" that can be called with no arguments and returns something that can be converted to bool. There are many ways to do that, but to keep things short, I'll skip right to the library I use most of the times, mock.
The main component of the mock library is the Mock class, which is basically an empty object with a few useful characteristics (be sure to check the documentation, because they are really useful). Two of them are important for this discussion. First, every time you access an attribute of a Mock object, another Mock object is created and assigned to the attribute being accessed.
>>> import mockAs you can see, when we tried to access some_attribute, a Mock object was created for us. We could do it by hand with a single line of code, but it makes it makes the code easier, shorter and cleaner.
>>> m = mock.Mock()
>>> print(m)
<Mock id='140095453080976'>
>>> print(id(m.some_attribute))
140095453131664
>>> print(m.some_attribute)
<Mock name='mock.some_attribute' id='140095453131664'>
>>> print(id(m.some_attribute))
140095453131664
The other feature of Mock objects is the return_value attribute. Whatever is contained in this attribute gets returned when the object is called as a function object [2].
>>> import mockUsing this two techniques, we can now test our function:
>>> m = mock.Mock()
>>> m.return_value = u'the return value'
>>> m()
u'the return value'
import mockLet's break that down. We first create a Mock object to represent the argument passed to the function. The next line takes care of the two things we need to test the function: the do_something attribute and its return value. Then, all we have to do is call the function, passing the mocked argument, and check the return value. After that, repeat the process, this time with a different return value.
def your_test():
a = mock.Mock()
a.do_something.return_value = True
if some_function_in_your_code(a) != 3.14159:
raise Exception(u'return wasn't 3.14159.')
a.return_value = False
if some_function_in_your_code(a) != 6.28318:
raise Exception(u'return wasn't 6.28318.')
That was the easy part
This first section was easy, nothing you couldn't find out with a quick search on the internet. But the real world is not that pretty (at least mine isn't). The trickiest situation is when you have to change the behaviour of something inside a function, but you don't pass that something as an argument. Suppose we have this:
# some_file.pyHow can you test that function if the value tested is conjured from oblivion in the middle of the function? Fear not, you can actually do it. The trick here is to mock the random function from the random module before the first line of f is executed. Let's start with this simple example, just to get the basic idea:
import random
def f():
if random.random() < 0.5:
return 3.14159
else:
return 6.28318
>>> import randomThis seems pretty simple. But here is where everybody gets lost:
>>> random.random()
0.5212285734499994
>>> random.random()
0.40492920488281725
>>> import mock
>>> random.random = mock.Mock(return_value=0.5)
>>> random.random()
0.5
>>> import randomThis may not explode the first time, but you have a 50% chance of getting an exception. To see why, you can put a print random.random inside f and see that the mock didn't work. To understand why, we have to dig a little deeper.
>>> import mock
>>> random.random = mock.Mock(return_value=0.5)
>>> import some_file
>>> some_file.f() == 6.28318 or raise ThisShouldNotBeHappeningException()
Import
What happens when you run import random? You can watch this video to know exactly what. Or you can just continue reading to get a summary. Or both. Anyway:
>>> locals()In python, locals is a built-in function that returns the local variables accessible on the current state of execution (don't believe me, run print(__builtins__.locals)). When you execute import random, the interpreter does its magic to find the module and load it, but more important, it creates an entry called "random" on the current namespace referring to the module loaded. The critical part here is "current namespace". Try this:
{'__builtins__': <module '__builtin__' (built-in)>, '__name__': '__main__', '__doc__': None, '__package__': None}
>>> import random
>>> locals()
{'__builtins__': <module '__builtin__' (built-in)>, '__name__': '__main__', 'random': <module 'random' from '/usr/lib/python2.7/random.pyc'>, '__doc__': None, '__package__': None}
>>> def f(): print(locals())Here, importing random didn't affect the namespace on f. The same thing applies to namespaces of other modules. Our example fails because the namespace on the some_file module is different than the namespace where we run our tests. To change the namespace of some_file, we have to do it explicitly:
>>> import random
>>> f()
{}
>>> import some_fileYou can run that many times if you don't trust me, but that will always succeed. And it does because we now are changing the correct namespace. You can check it by putting a print(random.random) on f again.
>>> some_file.random.random = lambda: 0.5
>>> some_file.f() == 6.28318 or raise ThisShouldNotBeHappeningException()
Being nice
Now you know how to mock, but there is something I must say before you leave. Always, always, ALWAYS restore any mock you do. Seriously. Even if you're sure no one will use the mocked attribute. You don't want to loose an entire day of work just to find out that the problem was an undone mock.
And doing it is so simple: store the original value on a variable and restore it after the operation. I like to do it as soon as the operation is complete, before anything else is executed, but you don't need to, if you're not paranoid. Just to clear any doubt, here is exactly how to do it:
>>> import randomNow you have no excuse. Better yet, you can use another feature of the mock library called patch. But that would be an extension to an already long post. Maybe I'll cover it in the future. Anyway, happy mocking!
>>> original_random = random.random
>>> random.random = lambda: 0.5
>>> # do something
>>> random.random = original_random
Notes
1: You shouldn't have complicated processes that involve hundreds of operations anyway, but that is another problem.
2: Curious to know what happens when you access return_value without setting it first? No? Well, I'll show you anyway:
>>> import mockSince we didn't set it, we get the default behaviour of __setattr__, which is to create another Mock.
>>> m = mock.Mock()
>>> m.return_value
<Mock name='mock()' id='140095453168080'>
Subscribe to:
Posts (Atom)

